Tutorial Guide
Hey there, thanks for visiting your CMS Tutorial guide. If you’ve received the link to this page, it means that you’re on your way to getting a fantastic new website!
The purpose of this page is to help give you an idea of all of the different ways we can layout content on your site. We use a Panel Concept, and you’ll be able to view the various options below.
Don’t worry; we will take care of ensuring your new site is both visually attractive and professional. This area is just a hub to help you during your content creation process. If you have any questions or need a little direction feel free to reach out to your account manager, and they will be able to help walk you through the process!
Panel 1: Standard Panel
Our Standard Panel is one of the most diverse panel options we have available. It can be used to create buttons or links, upload PDF’s and supporting documents or any other information you’d like to place here.
ButtonEmbed Media Liability Alt Button
Liability Button Button with Icon
The formatting options available here are also complex. We will upload all of the options so that it’s easy for you to use when you’re updating all of your own content.
Header 6
Header 5
Header 4
Header 3
Header 2
Panel 2: Promo Boxes

Rentals
Alberta Environment and Parks - River Basins (No Link)

Tubing

Access Points

Alberta Environment and Parks
Private Lessons
Lessons
Season Passes
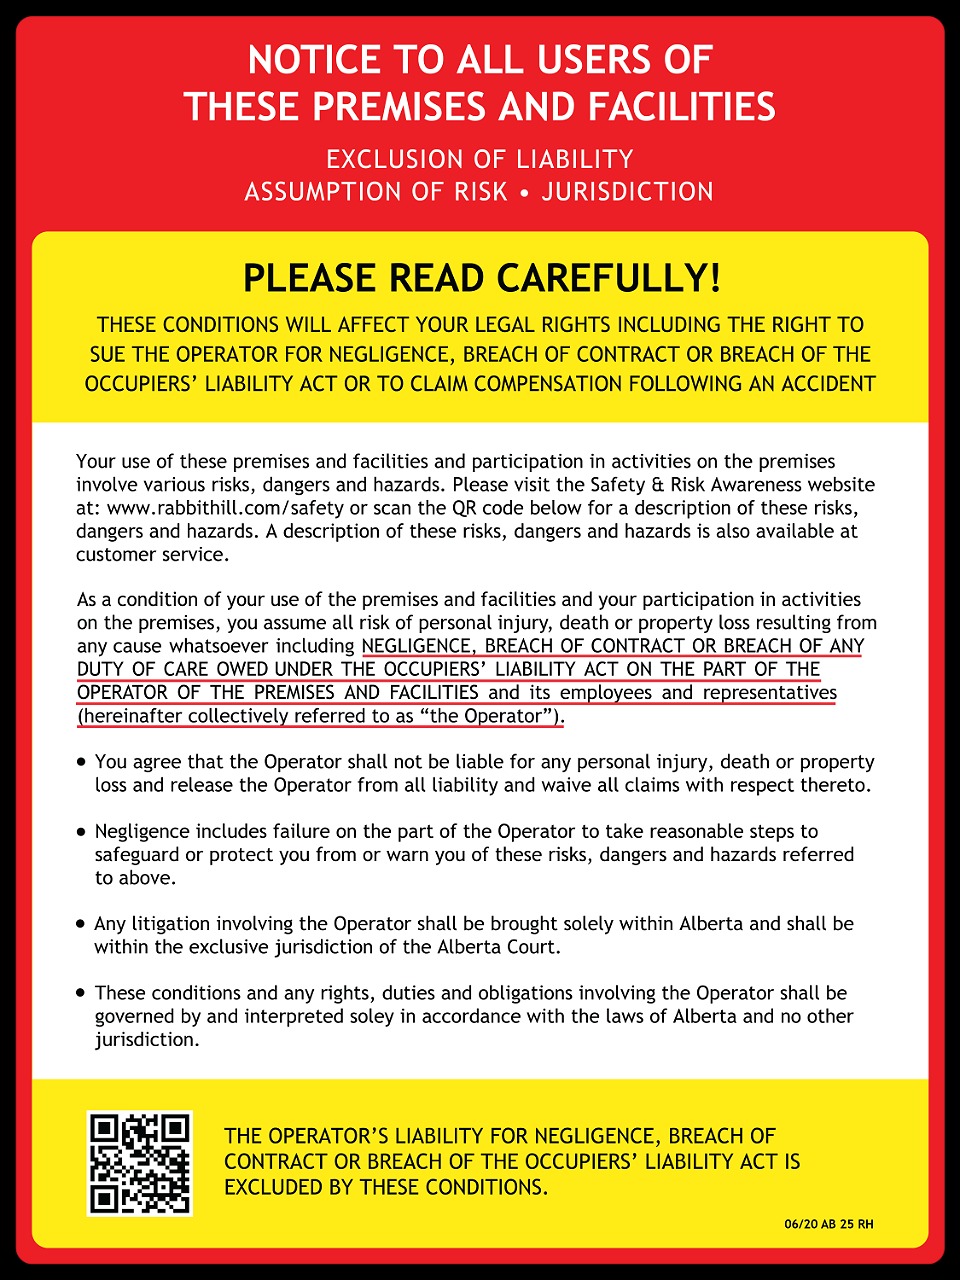
Winter Safety & Risk Awareness
Job Departments
test promo
Panel 3: Standard Panel With Tabs
Tab One Content
The standard panel tab concept was created to help our users split up content while keeping the page visually enjoyable for visitors.
- You can place in bullet points
- Attach photos and videos
- Create a table for information
The button tab names can be adjusted, so if you have a wide variety of services your company offers you can place it all on one page and users can easily browse through that information.
Tab Two Content
They can be utilized in a multitude of ways and can also be customized to fit your brand!
As displayed below, embedding a picture or video is no problem at all and can be a powerful tool to help compliment your content. As with a standard panel adding in links, buttons or directing the user to find out more information is all possible in this panel.
![]()
This is an inline Call To Action!
A call to action is a great way to help a user find their way around. Call to actions can have large, optional images attached to them to really grab a users attention.
Panel 5: Parallax Panel Insert
This is a Parallax Panel!
This panel type should be reserved for a short eye catching blurb of information. As you can see, the words stay in place while the image scrolls behind it. We recommend around 85 - 100 characters in this section if possible. If you need assistance with a background image feel free to reach out to your account manager and they can help you choose one.
Another great addition is that the parallax panel allows for a button which can be a URL link, a phone number or email. Keep this in mind as it’s great for helping with lead generation!
")
Panel 6: Side by Side (Image)
A Short Subtitle Goes Here!
Here is an example of a Side by Side panel with an image on the left!
They are a great tool that can be used to guide the users attention.
You can place information here and also pair it with a relevant picture to display your information.
")
Panel 7: Side by Side (Video)
A Short Subtitle Goes Here!
Here is another example of a Side by Side but this time with a video on the right hand side!
You can envision a similar concept as above, but this time you can place a relevant YouTube or Vimeo video here to help users understand the point you are making.
Panel 8: Photo Gallery


Panel 9: Promo Boxes (Mini)
Etiam ut purus mattis mauris sodales aliquam. Vestibulum suscipit nulla quis orci. Vivamus laoreet. Praesent ut ligula non mi varius sagittis. In enim justo, rhoncus ut, imperdiet a, venenatis vitae, justo.
Rentals
Alberta Environment and Parks - River Basins (No Link)
Panel 10: Partners & Associations
This is a dynamic Partners & Associations panel that can be inserted anywhere dynamic panel are placeable.


Panel 11: Dynamic FAQ’s
Lorem ipsum dolor sit amet, consetetur sadipscing elitr, sed diam nonumy eirmod tempor invidunt ut labore et dolore magna aliquyam erat, sed diam voluptua. At vero eos et accusam et justo duo dolores et ea rebum. Stet clita kasd gubergren, no sea takimata sanctus est Lorem ipsum dolor sit
Do I have to purchase lift tickets online or can I just show up and purchase the day of?
You aren’t required to, but we highly recommend it as you will SAVE on every lift ticket purchase. Plus, when you purchase your lift ticket online, you can go straight to one of our Pick Up Boxes to print your RFID card. Once you have your RFID card, you just need to reload your card online, and you can go directly to the lifts. You save time and money!!
If I purchase a lift ticket online, will I have to choose a date as well?
You will be required to pick a date when you purchase your lift ticket online. If you need to change your date, please contact us at [email protected].
To redeem your online lift ticket, just bring your barcoded receipt to one of our pick up boxes located outside the Lodge’s West Entrance, ticket windows or Customer Service staff to receive your RFID Lift ticket. Online lift tickets can also be redeemed in our Rental Shop. Any lift ticket purchased online must be used in the same season it was purchased. There are no refunds for unused lift tickets.
How far in advance can I purchase a lift ticket?
Lift tickets can be purchased online at anytime, and you will also save money when purchasing online. You will have to choose the date you wish to go riding but you can change your date, as long as the date is not past. Email us at [email protected] if you require a date change.
How do I cancel or get a refund for my online ticket purchase?
Lift tickets purchased online can be used on any day of the current season, so refunds are not available. If you need to change the date of your ticket, please email us at [email protected]. All tickets must be used by the closing date of the current season and cannot be transferred to future seasons. For details on our full Refund Policy, please click here.
Can I get a walking ticket to accompany my child in the beginner area?
Anyone who wishes to be on the snow requires a ticket. Walking tickets can be purchased at Customer Service for $5 for anyone who wishes to accompany someone in our beginner areas. Walking tickets are only for those walking and not in ski/snowboard gear. Walking tickets will not scan valid at our chairlift or T-bars.
Rabbit Hill reserves the right to withhold selling walking tickets if our beginner areas are too busy or during our scheduled lesson times.
How do I redeem a Voucher or Guest Day Pass?
All vouchers, donations, and guest day passes must be redeemed in person at Customer Service. At this time we are unable to redeem them online.
IMPORTANT - If you have already been issued a Rabbit hill RFID Card, please bring it with you to reload. If your RFID card has been lost or forgotten, there is a $5 replacement fee to issue a new card.
Can I use a snow bike at Rabbit Hill Snow Resort?
Yes, snow bikes are allowed at Rabbit Hill Snow Resort. However, they must meet the following requirements:
- Snow bikes must have metal edges.
- Riders must use a leash to ensure safety.
- Snow bike riders are required to use the t-bar lift. Snow bikes are not permitted on the chairlift.
Do you accept the Access 2 Card at Rabbit Hill Snow Resort?
Yes, we do! Access 2 Card holders pay the regular rate for full-day lift tickets and/or rentals, and their support person receives a complimentary ticket and/or rental. Present your Access 2 Card at Customer Service when purchasing your tickets or rentals to take advantage of this program.
Can I just use the beginner area?
Yes, we do offer Beginner Area Tickets.
The Beginner Area consists of the 2 base area rope tow lifts and the 2 conveyor lifts. Anyone in these areas must have a valid ticket.
These tickets must be purchased at Customer Service and are not available online.
Please note that a Beginner Area Ticket does not grant access to the temporary terrain park.
Rabbit Hill E-newsletter
Sign up for our newsletter and get information on sales, upcoming events and specials delivered right to your mailbox!
RABBIT HILL E-NEWSLETTER
Sign up for our newsletter and get information on sales, upcoming events and specials delivered right to your mailbox!
Templated Tables
What table would look like if there’s ’thead’ or ’th’
| Age Group | Full Day | 4 Hours | Last 2 Hours | First 2 Hours |
| Adult (18-65) | $49.00 | $42.00 | $20.00 | $25.00 |
| Youth (13-17) | $49.00 | $42.00 | $20.00 | $25.00 |
| Junior (8-12) | $49.00 | $42.00 | $20.00 | $25.00 |
| Student* (18+) | $49.00 | $42.00 | $20.00 | $25.00 |
| 55+ (55-64) | $49.00 | $42.00 | $20.00 | $25.00 |
| 65+ (65-69) | $49.00 | $42.00 | $20.00 | $25.00 |
| 70+ | Free | Free | Free | Free |
| Tyke (4-7) | $49.00 | $42.00 | $20.00 | $25.00 |
| 3 & Under (0-3) | $5.00 | $5.00 | $5.00 | $5.00 |
| Beginner Area** (All Ages) | $18.00 | $15.00 | $15.00 | $15.00 |
What table would look like if there’s no-header
| Age Group | Full Day | 4 Hours | Last 2 Hours | First 2 Hours |
| Adult (18-65) | $49.00 | $42.00 | $20.00 | $25.00 |
| Youth (13-17) | $49.00 | $42.00 | $20.00 | $25.00 |
| Junior (8-12) | $49.00 | $42.00 | $20.00 | $25.00 |
| Student* (18+) | $49.00 | $42.00 | $20.00 | $25.00 |
| 55+ (55-64) | $49.00 | $42.00 | $20.00 | $25.00 |
| 65+ (65-69) | $49.00 | $42.00 | $20.00 | $25.00 |
| 70+ | Free | Free | Free | Free |
| Tyke (4-7) | $49.00 | $42.00 | $20.00 | $25.00 |
| 3 & Under (0-3) | $5.00 | $5.00 | $5.00 | $5.00 |
| Beginner Area** (All Ages) | $18.00 | $15.00 | $15.00 | $15.00 |
Call to Action Panel
This Call-To-Action panel does not have a background image.
TEST: Formatting Options
Phasellus ut eleifend lacus. Quisque id neque eget turpis fringilla condimentum. Aenean at mauris id enim sagittis varius. Sed finibus enim posuere mattis pharetra. Mauris eu velit porta, luctus nisl eget, laoreet sem. Etiam vel porta mi. Aenean tristique facilisis mattis. Curabitur commodo elit felis, nec consectetur nunc elementum at.
Header Three (H3)
ButtonSimple ButtonHighlighted Button
Phasellus ut eleifend lacus. Quisque id neque eget turpis fringilla condimentum. Aenean at mauris id enim sagittis varius. Sed finibus enim posuere mattis pharetra. Mauris eu velit porta, luctus nisl eget, laoreet sem. Etiam vel porta mi. Aenean tristique facilisis mattis. Curabitur commodo elit felis, nec consectetur nunc elementum at.
Lorem ipsum dolor sit amet, consectetur adipisicing elit, sed do eiusmod tempor incididunt ut labore et dolore magna aliqua. Ut enim ad minim veniam, quis nostrud exercitation ullamco laboris nisi ut aliquip ex
Phasellus ut eleifend lacus. Quisque id neque eget turpis condimentum fringilla.
Aliquam erat volutpat. Aenean vitae nisi maximus, dignissim nisi sed, commodo orci. Curabitur posuere dui tellus, porttitor vehicula est aliquam vitae.
Header Four (H4)
Lorem ipsum dolor sit amet, consectetur adipiscing elit. Nulla id cursus leo. Phasellus nibh est, ullamcorper sed nunc ac, tempor tempor augue. Nam est leo, mollis quis lectus in, hendrerit varius nisl. Lorem ipsum dolor sit amet, consectetur adipiscing elit. Etiam fermentum lacus posuere mollis dapibus. Cras gravida enim nec euismod bibendum.
Nam est leo, mollis quis lectus in, hendrerit varius nisl.
Header 5 (H5)
Donec sagittis porta nunc vel ornare. Phasellus ut mi facilisis, ultrices nunc in, rhoncus tortor. Aliquam facilisis ex magna, id volutpat justo consectetur eget. Suspendisse scelerisque metus ut neque fringilla, ut faucibus quam venenatis. Proin nec velit porttitor, pulvinar nunc in, lobortis odio. Proin et posuere urna. Praesent vehicula nunc at tortor ultricies, eget tempus tellus faucibus.
| Sample Table Column 1 | Sample Table Column 2 | Sample Table Column 3 |
|---|---|---|
| This table was inserted through tinyMCE. | All of the styles (borders, colors, alignment, paddings) can be edited through the tinyMCE editor. | You can create multiple rows and columns. |
| You can assign which cells to be used as labels or "header cells" | This table is completely responsive. | It is best to not specify a width when creating tables as it will affect the responsiveness of the table (do not drag the edges of the cells - doing so will assign fixed widths to the cells). |
Header 6 (H6)
Phasellus ut eleifend lacus. Quisque id neque eget turpis fringilla condimentum. Aenean at mauris id enim sagittis varius. Sed finibus enim posuere mattis pharetra. Suspendisse scelerisque metus ut neque fringilla, ut faucibus quam venenatis.
Curabitur maximus ante ac efficitur consectetur. Curabitur lobortis vitae enim sit amet maximus. Sed in semper ante. Pellentesque egestas magna dapibus, egestas tortor non, malesuada urna. Nulla lectus mi, condimentum in commodo et, semper et tortor.
test


Welcome To Rabbit Hill
Lorem ipsum dolor sit amet, consetetur sadipscing elitr, sed diam nonumy eirmod tempor invidunt ut labore.
TEST: CTA With No Image
A call to action is a great way to help a user find their way around. Call to actions can have large, optional images attached to them to really grab a users attention.
test table
Building a Better Future for Our Customers |
Lorem ipsum dolor sit amet, consectetur adipiscing elit. Curabitur posuere odio vel sodales efficitur. Fusce non risus aliquet, lobortis eros ac, mattis dui. Class aptent taciti sociosqu ad litora torquent per conubia nostra, per inceptos himenaeos. Aliquam venenatis orci turpis, in tempor neque porttitor vitae. |
test table 2
About UsDiscover Our Story: Learn About Us Today! |
Stay UpdatedStay Updated: Get the Latest News Here! |